Gmail Tricks: Secrets To Hack Your Gmail Life 2015
The person who know Gmail tricks is a life hacker.
Do you know why?
Because he/she has more control over their Gmail accounts! Also saves a lot of time too.
Today I have something that will make you feel like you have Gmail super powers:
Gmail tricks and secrets to be the best Gmail user.
It's more like... being a power user.......Let's start.
You might also like: Xprivacy- Hackers Android App
1.Undo Your Sent Message to Avoid Email Blunders
You can stop messages from being sent for few seconds after hitting the "Send" button in Gmail!
It's possible........
Here is how you can enable "undo" in sent message:
First, sign in to your Gmail account. Then go to Gmail's settings:
In the settings page, click on the "Labs" tab:
Now scroll down and find "Undo Send":
Click on "Enable" and then click on "save changes". The window will reload the Gmail, you are ready to use the "Undo Send" feature.
Next time when you send an email, the "undo" option will also be in the notification!
You can also change the cancellation period, just go to Settings--->General. Scroll down to the "Undo Send" section and change the number of seconds. You can change the number of seconds up to 30 seconds.
Let's move onto the trick #2........
You might also like: Google Dorks Ultimate Collection For Hackers
2. Change Default Reply Behaviour to All
Now you can forget that.......wait...... Just do this:
Go to "settings", under the "General" tab, you can find "Default reply behaviour" :
Enable "Reply all" and then click on "save changes".
Next time when you try to reply a message with multiple recipients, the "Reply to all" option will automatically be selected.
If you want don't want to reply all, you can select "Reply" manually.
..........move onto the technique #3
3. Unsubscribe All Newsletters In One Click
Or you can find something like this at the end of the newsletter:
But what if you want to unsubscribe all the newsletters in a single click?
It's definitely possible, but with an extra help from "Unroll.me":
Here is how to cleanup your inbox using unroll.me:
First, go to unroll.me and then click on "get started now"--- Enter your email address.
Check the "I agree to terms and the privacy policy" box and then click "Continue".
Then click on "accept". Then wait for some time, unroll.me will scan your inbox and display the number of subscriptions:
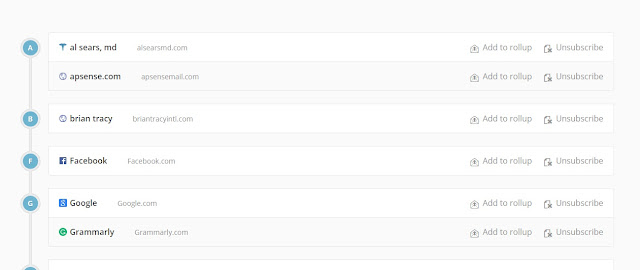
Then click on "Continue to the next step". It will display the subscribed newsletters along with an "unsubscribe" button:
Click on "unsubscribe". Pretty easy, right ?
Let's move move onto the trick #4.....
You might also like: My Favourite Computer Pranks
4. Identify Malicious Activity In Your Gmail Account
Logon to your gmail account, then scroll down, you can find a tiny text - "Last account activity: x minutes ago" "Details":
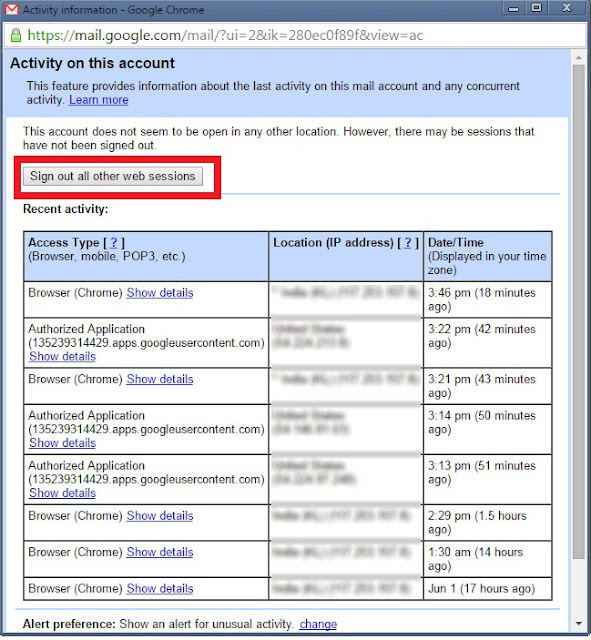
Click on "Details", it will open the "Activity Information" page:
There you can find all the current sessions. If you don't recognize some activities, click on " sign out all other web sessions" and then immediately change your current password.
Here is a simple guide to build strong passwords, check it out: How To Build Strong Passwords.
You can also see the list of devices that accessed your account. Just go to Devices & activity. There you can find the devices that have been active on your account in the last 28 days, or are currently signed in (device name, location, browser and the login time).
You might also like: 20 Ways To Increase Hacking Skills And Think Like A Hacker
5. Select Multiple Messages At Once
Selecting messages? There is a quick way to select multiple messages in Gmail!
Here it is:
You can select multiple emails in Gmail by clicking the first email in
the series, then holding "Shift" key and clicking the last of the series
you'd like to select.
6. Use Gmail Offline
Of course, you can't receive and send emails without the Internet connection. But you can read emails and draft messages!
How:
If you are using Google chrome, go to Gmail Offline chrome extension. Then click on "ADD TO CHROME". A small dialogue box will pop up:
Click on "Add". After adding the app to chrome, go to chrome://apps/ and click on "Gmail Offline" app. The below page appears:
Click on "Allow offline mail" and then click on "Continue".
You are now able to use Gmail offline!
Whenever you want to use Gmail offline, open Google Chrome and then go to chrome://apps/ , click on "Gmail offline" app.
7. Canned Email Responses
Gmail describes this feature as "Email for the truly lazy". It allows
you to save email templates and then send those common messages using a
button next to the compose form.
The more interesting thing is......you can automatically send these common messages by creating filters!
Here is how to do it:
Open your Gmail account and then go to settings. Then click on "Labs" tab.
Find "Canned Responses" and enable it.
Then click on "save changes".
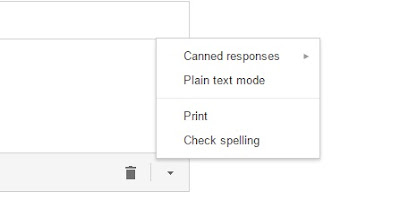
Whenever you want to send message, you can find "canned responses" option there:
If you want to create a new canned response, type the meessage, then go to Canned responses---->New canned response... and then enter a name for the new canned message.
You might also like: dSploit - Android App For Hackers
If you enable this feature you can see more important messages at once!
After the relaunch, you will see an additional tab called "Multiple inboxes" in "settings":
Enter a search query and a name to create your own customized inbox.
You might also like: DroidSheep Tool - Android App
The more interesting thing is......you can automatically send these common messages by creating filters!
Here is how to do it:
Open your Gmail account and then go to settings. Then click on "Labs" tab.
Find "Canned Responses" and enable it.
Then click on "save changes".
Whenever you want to send message, you can find "canned responses" option there:
If you want to create a new canned response, type the meessage, then go to Canned responses---->New canned response... and then enter a name for the new canned message.
You might also like: dSploit - Android App For Hackers
8. Create Multiple Inboxes
You can create up to 5 custom inboxes.You can enable it by going to the Settings---->Labs, and then "Multiple Inboxes"(Just click on Enable). Then click on "save changes" button.
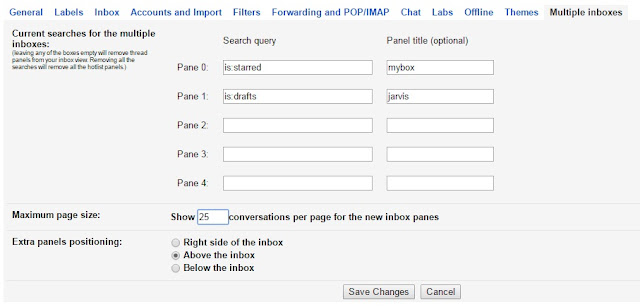
After the relaunch, you will see an additional tab called "Multiple inboxes" in "settings":
Enter a search query and a name to create your own customized inbox.
You might also like: DroidSheep Tool - Android App
9. Drag and Drop Messages
Drag and drop messages or labels in Gmail!. You can drag and drop a
message from your inbox to labels like Starred, Personal, Travel,
Receipts and Work, and also folders like Trash and Spam.
10. Auto-advance For Easy Gmail
It is a Labs feature that automatically shows the next conversation
instead of your inbox after you delete, archive, or mute a
conversation.
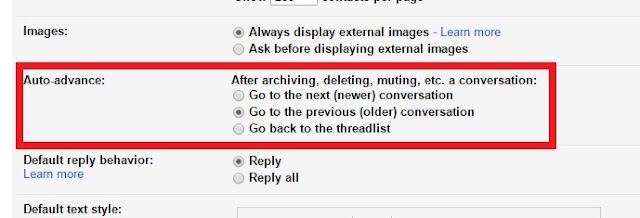
After enabling the feature, you can define the action by going to Settings ------>General where you will see a new option called "Auto-advance".
Then select "Go to the next (newer) conversation" and save the changes.
You might also like: FaceNiff Tool - Android App
11. Increase Number Of Conversations and Contacts Per Page
Receiving a lot of emails? This feature is only for you! You can
increase the number of conversations and contacts per page. Just go to Settings ---->General. Then change the number of conversations and contacts:
After changing the maximum page size, click on "save changes".
12. Email Notifications On Your Desktop
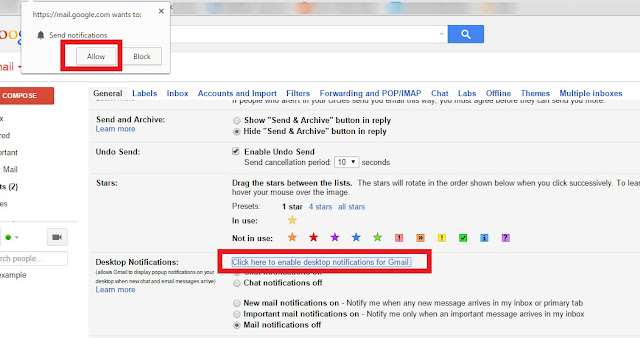
You can get email notifications on your desktop, all you have to do is....go to Settings----->General, then
find the "Desktop Notifications" section and click on "click here to
enable desktop notifications for Gmail" and then allow the gmail to send
notifications:
13. You Have Two Email Addresses: @gmail.com and @googlemail.com
Do you have multiple addresses? You don't really need it! Here is why:
Did you know, Gmail was known as Google Mail until 2010. So, when you
register username@gmail.com, the username@googlemail.com also become
unavailable to other users. That is, you can use both email addresses.
All emails sent to username@gmail.com or username@googlemail.com goes to the same inbox.
14. You Can Add Dots(.) and Plus Sign (+) In Gmail Address
Yes, you can add dots and plus signs in your gmail address. Let's say my gmail address is gokulworking@gmail.com.
Since Gmail doesn't recognize dots as characters within usernames, I can add or remove dots like mad.:)
That is,
gokulworking@gmail.com = gokul.working@gmail.com
gokulworking@gmail.com = g.o.k.u.l.w.o.r.k.i.n.g@gmail.com
Also,
gokulworking@gmail.com = g.o.k.u.l.w.o.r.k.i.n.g@googlemail.com
Plus Sign Addressing
As I said before, you can add plus signs in your email address, more clearly, after your usernames.
For instance,
gokulworking@gmail.com = gokulworking+spotify@gmail.com
gokulworking@gmail.com = gokulworking+ anything123757four@gmail.com
You can't register multiple Facebook accounts using dots or plus sign
addressing, because the Facebook also doesn't recognize the plus signs
and dots as characters.
15. Know Who Is Spamming You
You can use the above mentioned "plus addressing" to identify who is
spamming you. Next time, when you sign up for a newsletter, use
"username+newslettername@gmail.com".
16. Change Display Density To Make Your Inbox Looks Good
You can make your inbox comfier by clicking on the gear button and
changing the display density to comfortable. There are two other options
available, Cozy and Compact....check it out...
17. Type Right to Left
If you want to type from right to left, go to Settings---->General, then turn on right to left editing support.
Next time, when you type a message, you will see a button in the "Formatting Options":
Click on it to type from right to left!
18. Send and Archive
You know, you don't have to delete emails, just Archive them. So you can always find the message you want.
If you want to send reply to emails and archive them, "Send and Archive" feature is for you. Go to Settings--->General, and then enable "Show Send &Archive button in reply".
Next time when you reply to messages, you will see a "Send & Archive" button there.
19. Using Gmail Without a Mouse
You can use Gmail without a mouse!
First, you have to enable keyboard shortcuts in Gmail. So, go to Settings---->General. Then turn on the "keyboard shortcuts".
Here is the complete list of Gmail keyboard shortcuts:
Compose and Chat
<Shift> + <Esc> : Focus main window<Esc> : Focus latest chat or compose
<Ctrl> + . : Advance to next chat or compose
<Ctrl> + , : Advance to previous chat or compose
<Ctrl> + <Enter> : Send
<Ctrl> + <Shift> + c : Add cc recipients
<Ctrl> + <Shift> + b : Add bcc recipients
<Ctrl> + <Shift> + f : Access custom from
<Ctrl> + k : Insert a link
<Ctrl> + ; : Go to previous misspelled word
<Ctrl> + ' : Go to next misspelled word
<Ctrl> + m : Open spelling suggestions
Formatting
<Ctrl> + <Shift> + 5 : Previous font<Ctrl> + <Shift> + 6 : Next font
<Ctrl> + <Shift> + - : Decrease text size
<Ctrl> + <Shift> + + : Increase text size
<Ctrl> + b : Bold
<Ctrl> + i : Italics
<Ctrl> + u : Underline
<Ctrl> + <Shift> + 7 : Numbered list
<Ctrl> + <Shift> + 8 : Bulleted list
<Ctrl> + <Shift> + 9 : Quote
<Ctrl> + [ : Indent less
<Ctrl> + ] : Indent more
<Ctrl> + <Shift> + l : Align left
<Ctrl> + <Shift> + e : Align center
<Ctrl> + <Shift> + r : Align right
<Ctrl> + <Shift> + , : Set right-to-left
<Ctrl> + <Shift> + . : Set left-to-right
<Ctrl> + \ : Remove formatting
Jumping
g then i : Go to Inboxg then s : Go to Starred conversations
g then t : Go to Sent messages
g then d : Go to Drafts
g then a : Go to All mail
g then c : Go to Contacts
g then k : Go to Tasks
g then l : Go to Label
Threadlist selection
* then a : Select all conversations* then n : Deselect all conversations
* then r : Select read conversations
* then u : Select unread conversations
* then s : Select starred conversations
* then t : Select unstarred conversations
Navigation
u : Back to threadlistk / j : Newer/older conversation
o or <Enter> : Open conversation; collapse/expand conversation
p / n : Read previous/next message
` : Go to next inbox section
~ : Go to previous inbox section
Application
c : Composed : Compose in a tab (new compose only)
/ : Search mail
q : Search chat contacts
. : Open "more actions" menu
v : Open "move to" menu
l : Open "label as" menu
? : Open keyboard shortcut help
Actions
, : Move focus to toolbarx : Select conversation
s : Rotate superstar
y : Remove label
e : Archive
m : Mute conversation
! : Report as spam
# : Delete
r : Reply
<Shift> + r : Reply in a new window
a : Reply all
<Shift> + a : Reply all in a new window
f : Forward
<Shift> + f : Forward in a new window
<Shift> + n : Update conversation
] / [ : Remove conversation from current view and go previous/next
} / { : Archive conversation and go previous/next
z : Undo last action
<Shift> + i : Mark as read
<Shift> + u : Mark as unread
_ : Mark unread from the selected message
+ or = : Mark as important
- : Mark as not important
<Shift> + t : Add conversation to Tasks
20. Email Signatures
Do you want to add your signature at the end of all outgoing messages?
If you want it, just go to the Settings --->General.
Then find the "signature" section:
Then enable the signature feature. Enter your signature in the box and
save the changes. You can add images, text, and links in it. Also use
the formatting options to make your signature good.
HTML codes are not allowed.
21. Vacation Responder
It is a nice feature you can enable when you are on a vacation. It sends
an automated reply to incoming messages. If a contact sends you several
messages, this automated reply will be sent at most once every 4 days.
How:
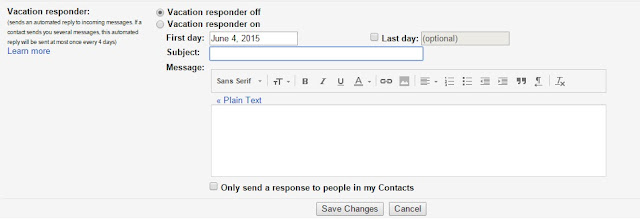
First, go to Settings---->General and then find the "Vacation responder" section.
After turning the vacation responder on, enter the "First day" and "Last day" of your vacation.
Then enter a subject. Example, "On a Vacation".
After typing the subject, enter the message. Then click on"save changes".
If you only wanted to send responses to people in your contacts, enable
"Only send a response to people in my Contacts" before saving the
changes.
Let's move onto another trick!
22. Send Attachments Up To 10 GB
You can send attachments up to 10 GB! Yes, it's possible...
Here is how to send email attachments up to 10 GB:
Just click on the "Google Drive" icon on the compose window. A window appears (select the "upload" tab):
Change Insert as to "Attachment". Then select the files and upload it.
23. Gmail Advanced Search
Just like Google dorks, you can search your Gmail account for various
things like documents and messages. Gmail search also allows you to
search inside the attached documents, which I think is a very useful
feature.
Anyway, here is the complete list of Advanced search operators: Advanced Search Operators
24. Email Forwarding
You can forward every single messages to another email address! Just go to Settings---->Forwarding and POP/IMAP and add a forwarding address by clicking on " Add a forwarding address" button.
You can also create an auto-updating blog by using this feature (my own experiment).
25. Create Filters To Automate Your Gmail
Here is how to filter in Gmail:
To create filters, go to Settings ---> Filters ----> Create a new filter.
For example, here is simple filter you can use to archive the messages from "username@gmail.com":
from:(username@gmail.com)
Skip the inbox (Archive it)
Get more information about creating and managing filters from here [PDF].


