If your PC setup includes a mouse and keyboard, you’ll
be happy to know that most of the touchscreen-first features of Windows 8
have gone by the wayside in Windows 10. Where it once required awkward
gestures to access key features, Windows now recognizes when you’re
using a traditional desktop or laptop, then responds by making sure that
all features can be easily discovered with clickable buttons and menu
entries.Unfortunately, there are still a few minor remnants of Windows
8’s touchscreen-first approach. Most notably, a lock screen greets you
as soon as you boot your PC, which has to be clicked or swiped away
before you can log into Windows. While this might be great for
preventing accidental pocket unlocking on smartphones and tablets, it
really serves no purpose on a traditional PC, so I’ll show you how to
disable it below.
Method 1: Use Group Policy Editor to Disable the Lock Screen
This first method is the easiest, but it may not work for some folks,
as the Group Policy Editor program that it uses is not included in all
editions of Windows.
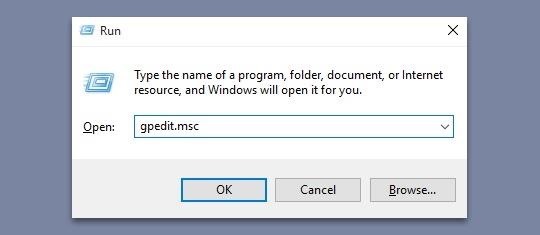
To get started, hold down the Windows button on your keyboard, then press the R key to launch the Run dialog. From here, type “gpedit.msc” and press Enter.
If you get an error message at this point, you’ll have to use Method 2
(outlined below), but otherwise, you should see the Group Policy Editor
window pop up.
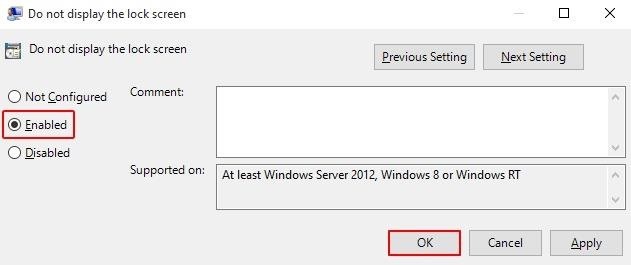
In the Group Policy Editor now, expand the Computer Configuration folder tree in the left pane of the window. From here, expand the Administrative Templates and Control Panel subfolders, then click the Personalizationfolder to select it. Next, double-click the entry in the right pane of this window that says “Do not display the lock screen.”
From the window that pops up next, select the “Enabled” option on the
left-hand side, then click “OK” at the bottom of the screen. When
you’re done here, simply reboot your computer and the Windows 10 lock
screen will be gone for good.
Method 2: Use Registry Editor to Disable the Lock Screen
Some versions of Windows 10 do not include the Group Policy Editor
program, so if typing “gpedit.msc” into the Run dialog on your computer
caused an error, this is likely the reason. That’s no biggie, though,
because this second method will remove the lock screen on all versions
of Windows 10.
To begin, press and hold the Windows button on your keyboard, then hit the R key to open the Run dialog. Next, simply type “regedit” and hit Enter.
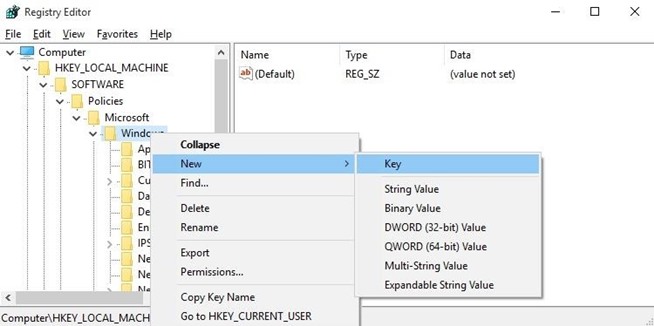
In the left pane of the window that comes up next, expand each of the following folders.
Next, right-click the Windows folder, then choose “New” and select “Key.”
From here, right-click this newly-created key and choose “Rename,” then change the name to read Personalization.
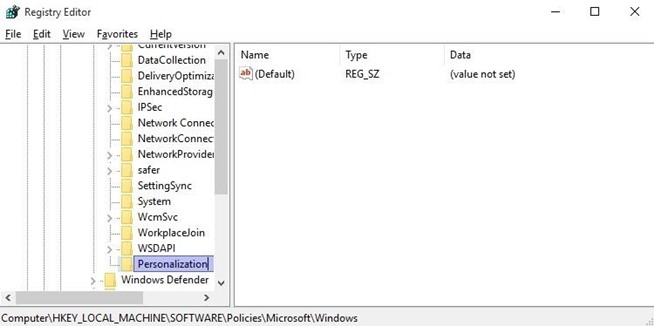
Next, select the Personalization key that you just created
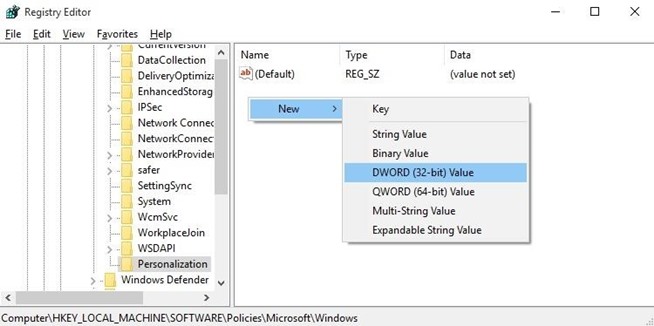
by clicking it once, then in the right pane of the window, right-click
any empty space and choose “New,” then “DWORD (32-bit) Value.”
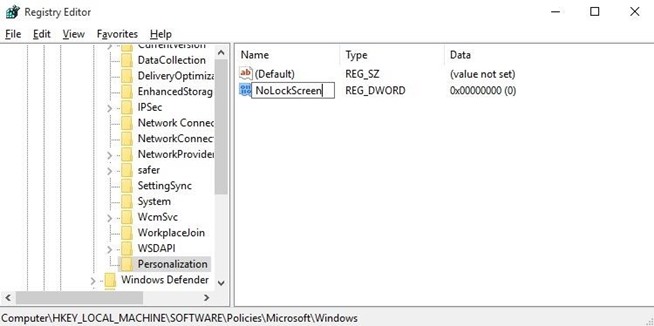
When you’re done with that, right-click this newly-created DWORD and choose “Rename,” then change the name to read NoLockScreen.
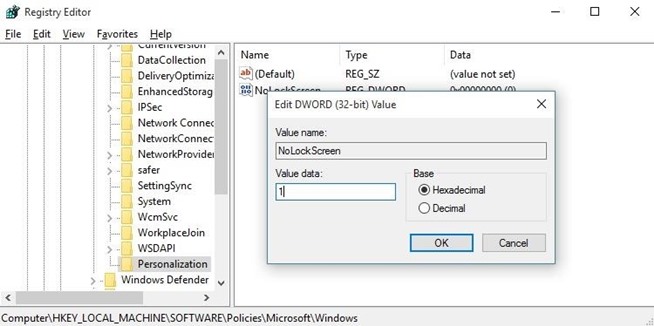
From here, double-click the NoLockScreen DWORD that you just renamed, then a small window will pop up. In the “Value data” field of this pop-up, enter the number 1, then click “OK.”
At this point, just reboot your PC, and when you get back up, you shouldn’t see the superfluous lock screen anymore.
Note on Disabling the Windows 10 Login Screen & Password Prompt
On a related note, it is possible to disable the Windows 10
login screen so that you don’t have to enter a password after booting
your PC, but that subject would warrant a separate tutorial, and it
comes with one big downside: If you disable the password prompt and
login screen on Windows 10, you’ll lose the ability to sync settings and
data across all of your Windows devices. Hopefully this process becomes
a bit more stable in future builds, and we’ll cover it at that time.
Which method did you use to disable the lock screen on Windows 10? Let us know in the comment section below,
Enjoy!