How To Protect USB Drive and Files From Malicious Access

A quick guide of USB disk and file security techniques:
USB drives are undoubtedly the perfect way to transport files between
two computers. They are also more secure and faster than cloud data
transfer.
But if you want protect your USB drive and files from malicious access, you will need something powerful. Scanning the USB drive with antivirus programs cannot provide you the best protection. More clearly, antivirus programs are not really an option.
So, here are the best ways to protect your USB drive and files from malicious access:
1. Password Protect Your Files

You can set passwords for every types of files..... including images, videos, documents and executables.
Here is how to password protect images, videos or executable files:
1. Download WinRAR application....
2. Install it on your computer.
3. Select the files you want to protect.
4. Right click on the selected files and then select "Add to archive".

5. A window will appear:

6. Select the "Advanced" tab and click on the "set password" button:


Here is how to password protect document files using MS Office 2013:Here is how to password protect images, videos or executable files:
1. Download WinRAR application....
2. Install it on your computer.
3. Select the files you want to protect.
4. Right click on the selected files and then select "Add to archive".

5. A window will appear:

6. Select the "Advanced" tab and click on the "set password" button:

7. Enter the password and click on the "OK" button. Then click "OK" again to create the password protected archive file.
Now you can move the archive file to your USB drive........
Whenever you want to access those files, open the archive file by giving the correct password and then extract it.
Alternate Methods:
If you want to password protect a single image file, you can use the below method:
1. Download the Lock Image program....
2. Extract the LockImage-0.1-bin.zip file and then run LockImage.exe. A window will appear:

3. Go to File > Open..... then select the image file you want to lock....
4. Click on the "Open" button:

5. You will get a window like this:

6. Go to File > Save as:

7. Type a name for the file and click on the "save" button. A small window will appear:

8. Type a password for your image file and click on "OK".
You will get an executable file......(see the image below):

Whenever you want to access the protected image file, double click on the executable file... a window will appear:

Enter the password and click "OK".
Note: The problem with the above method is you cannot modify or use the protected file. You can only view it..
If you want to password protect a video file, here are two best methods:
- Using GreenForce Media Player
1. Download the GreenForce Media Player.
2. Install the program on your computer...

3. Run GreenForce Media Player...and then go to DRM > Protect Video. A window will appear:

4. Select the media you want to protect and then select the destination folder.
6. Enter a password for the file.....and click on the "Save" button.
The video file will be saved in gfp format (GreenForce Media Player format). You cannot play gfp files using other media players.
To overcome this limit, you can do a simple thing before saving the
file. That is, just select "Add player to the media file". This will
convert the video file into an executable file.
Whenever you want to watch the protected video, double click on the executable file and then enter the password.

Then....click on the "OK" button. That's it.
- Using Password Protect Video Master
1. Download Password Protect Video Master.
2. Extract the zip file.
3. Double click on "Password Video Master.exe". A window will appear:

4. Enter a encryption key (password) and video id.
5. Select the video you want to protect. (click on "choose video" button).
6. Set the values as in the image below or set them according to your needs.

7. Click on "Encrypt" button. Wait for some time, until it completes.
If you want to watch the encrypted video, double click on the encrypted video file, and then enter the Encryption key.
For password protecting a document file, follow the below steps:
In Open Office:
1. Open the document you want to put a password on, then go to File > Save As.

2. A window will appear:

3. Enter a file name and then select the "save with password" option.... and click on "save" button. A small window will pop up:

4. Enter the password into the field and then click on the "OK" button.
Whenever you want to access the password protected file, open it, you will be greeted with a password dialog box:

Enter the password and then click on the "OK" button.
In MS Office:
1. Open the document you want to protect. Then go to File > Info:

2. Click on the protect document icon. A drop down menu will appear:

3. Select "Encrypt with password. A small window will appear:

4. Type a password in the box and then click on the "OK" button.
5. Re-enter the password and click on "OK".
6. Save the protected file.
In Adobe Acrobat Pro:
1. Open the document you want to protect using Adobe Acrobat Pro.2. Go to Advanced > Security > Password Encrypt. A small dialog box will appear:

3. Click on the "Yes" button. Another window will appear:
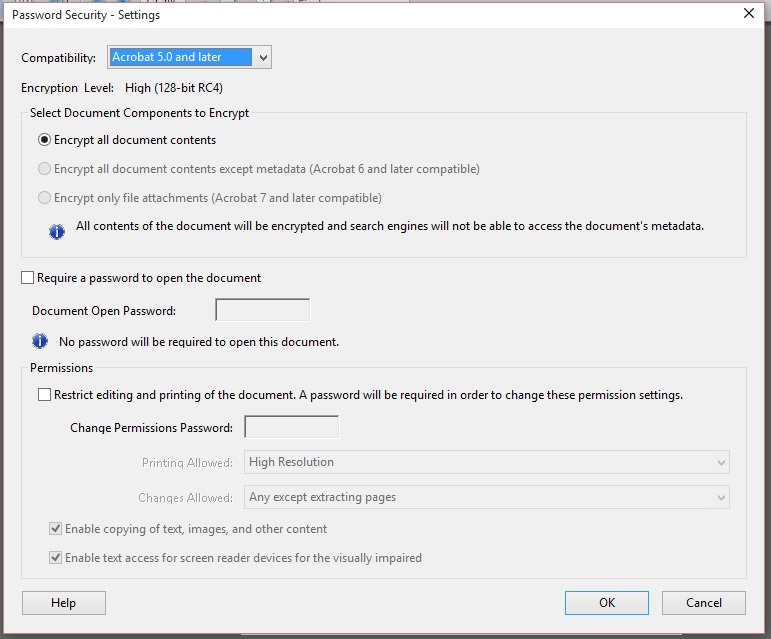
4. Select "Require a password to open the document" and then enter a password.
5. Click on the "OK" button and then confirm the "Document Open Password".
6. Go to File > Save.
The document should now be protected.....
PrimoPDF, Weeny Free PDF Cutter and Foxit PhantomPDF are the best alternatives to Adobe Acrobat Pro..
There are many online tools available to password protect PDF files. Some of them are given below:
✔ PDF Protect
✔ FoxyUtils Protect PDF
✔ Conversion-Tool PDF Locker
Now, let's move onto the next technique....
2. Encrypt the Files or Partitions

- Using Rohos Mini Drive:
1. Download the Rohos Mini Drive and install it on your computer...
2. Run it.

3. Insert your USB drive on the computer...
4. Click on " Encrypt USB drive". A window will appear:

2. Run it.

3. Insert your USB drive on the computer...
4. Click on " Encrypt USB drive". A window will appear:

5. If you want to change the USB device, use the change option and then enter the password.
6. After re-entering the password in the second box, click on "create disk" button.
6. After re-entering the password in the second box, click on "create disk" button.
7.Wait for some time..... Grab a cup of coffee... (that's what I did)
8. A window will appear:
 9. Go to "My Computer", you will see an encrypted partition there:

10. Open the "Encrypted Disk"..... then move/copy the files you want to protect to the "Encrypted Disk".
Now you can remove the USB drive from the computer...
1. Plug in the USB drive to a computer... then open it.
2. Double click on "Rohos Mini Drive (Portable)". A window will appear:

3. Enter the password and then click on the "OK" button. You will see the files:

4. Now you can open, export, delete or rename the files.
You can also encrypt applications using Rohos Mini Drive. Here is how to do it:
1. Insert the USB drive and enter the password....
2. Run Rohos Mini Drive, then click on " Encrypt Application":

3. A window will appear:

4. Select the app you want to encrypt from the drop down menu or you can specify a folder path manually.
5. Click on the "OK" button. You will see a small window like this:

Now you can remove the USB drive.
Insert the USB drive, and then enter the password. The folder or application will appear.
To delete the encrypted disk, go to Tools > Delete disk.
To enlarge disk space, go to Tools > Enlarge (you have to upgrade your license to use this feature).
To run a disk check on the encrypted partition, go to Tools > Check disk.
To change the password, go to Tools > Change password.
To create a password reset file, go to Tools > Create Password Reset File. Then enter the current password and click on "Create backup".
Did you know, your windows computer has a built-in tool to protect any drive, including external, internal, flash drive with a password.
Yes, I'm talking about BitLocker. Here is how to use it:
1. Connect the USB drive to the computer, then right-click on the drive and then select Turn on BitLocker:

2. A window will appear:

3. Select "Use a password to unlock the drive" and then enter the password...
4. Click on the "Next" button.

5. Click on "Save to a file" and then save it.
6. Click on "Next".

7. Choose the suitable option and click on the "Next" button. Then click on "Start Encrypting".
8. Wait for some time, until it completes.
Now you can remove the USB drive from your computer.
Whenever you insert the encrypted drive to a computer, your flash drive will look like the below screenshot:

If you want to access the encrypted files, double click on the removal disk and then enter the password.
2. Right click on it....then select "Manage BitLocker" > Turn off BitLocker.
3. Wait for some time, until it completes.
Enjoy!
If you don't want to install third party software on your computer, you can use File Lock web app to encrypt and password protect your files.8. A window will appear:


10. Open the "Encrypted Disk"..... then move/copy the files you want to protect to the "Encrypted Disk".
Now you can remove the USB drive from the computer...
How To Access Encrypted Files:
2. Double click on "Rohos Mini Drive (Portable)". A window will appear:

3. Enter the password and then click on the "OK" button. You will see the files:

4. Now you can open, export, delete or rename the files.
You can also encrypt applications using Rohos Mini Drive. Here is how to do it:
1. Insert the USB drive and enter the password....
2. Run Rohos Mini Drive, then click on " Encrypt Application":

3. A window will appear:

4. Select the app you want to encrypt from the drop down menu or you can specify a folder path manually.
5. Click on the "OK" button. You will see a small window like this:

Now you can remove the USB drive.
How To Access Encrypted Application or Folder:
Insert the USB drive, and then enter the password. The folder or application will appear.
To delete the encrypted disk, go to Tools > Delete disk.
To enlarge disk space, go to Tools > Enlarge (you have to upgrade your license to use this feature).
To run a disk check on the encrypted partition, go to Tools > Check disk.
To change the password, go to Tools > Change password.
To create a password reset file, go to Tools > Create Password Reset File. Then enter the current password and click on "Create backup".
- Using BitLocker Drive Encryption:
Did you know, your windows computer has a built-in tool to protect any drive, including external, internal, flash drive with a password.
Yes, I'm talking about BitLocker. Here is how to use it:
1. Connect the USB drive to the computer, then right-click on the drive and then select Turn on BitLocker:

2. A window will appear:

3. Select "Use a password to unlock the drive" and then enter the password...
4. Click on the "Next" button.

5. Click on "Save to a file" and then save it.
6. Click on "Next".

7. Choose the suitable option and click on the "Next" button. Then click on "Start Encrypting".
8. Wait for some time, until it completes.
Now you can remove the USB drive from your computer.
Whenever you insert the encrypted drive to a computer, your flash drive will look like the below screenshot:

If you want to access the encrypted files, double click on the removal disk and then enter the password.
How To Remove BitLocker Password Protection:
1. Unlock the drive using the password.2. Right click on it....then select "Manage BitLocker" > Turn off BitLocker.
3. Wait for some time, until it completes.
Enjoy!
- Using File Lock Web Application:
How To Use File Lock:

2. Click on the "Choose File" button and then select the files you want protect, then click on "Open" button.

If you want to set passwords for each files, type them in the password fields.... and then click on"All" button to encrypt the files.
As soon as you click on the "All" button, the File Lock web application will initiate downloads of encrypted files (local downloads):

These files have something in common, did you notice it? Yes, the .enc extension. That means, the files are encrypted.
Now.... you can send or move these encrypted files...
Note: You can't get the original
file by manually changing the extension to the original one. For
example, file lock.jpg.enc to file lock.jpg..
Here is how to decrypt the File Lock encrypted files:
1. Go to the File Lock home page.
2. Click on "Choose Files" button and then select the encrypted files..... then open it:

3. Enter the passwords in the boxes and then click on "All" to decrypt them.

There are many sites you can use to encrypt files. Some of them are given below:
✔ Encryptur
✔ Vmola
✔ Xnode
Let's move onto the next one.....
- Using USB Secure:
1. Download USB Secure...2. Install it on your USB drive.
3. Go to the USB drive and then run the USB secure program. A window will appear:

4. Click on the "Yes" button.... and then enter the password.
5. Click the "OK" button. Then select a suitable option:

[Here I want to lock my USB drive, so, I'm selecting the first option - "Lock my USB drive".]
Your USB drive should now be protected. Now you can remove the flash drive from your computer.
Whenever you want to access the protected files, insert the USB drive and then execute the "USB secure" program. Then enter the password and click on"OK".
Then select "Unlock my USB drive". That's it.
- Using USB Flash Security:
1. Download USB Flash Security and then install it on your computer.
2. Run it. You will see a window like the one below:

3. Click on the "Install" button. A dialog box will pop up, click "OK".
4. Enter the password.
Now you can remove your USB drive.
To access the files, plug in the drive and then enter the password.
Here is how to remove the USB Flash Security password protection:
1. Connect the flash drive to the computer.
2. Run "USB flash security" program.
3. Select "Uninstall".
That's it.
Let's move onto the next technique..
3. Use Hardware Encrypted Flash Drives:
Make your documents super secure by using a hardware encrypted flash drives. There are many products out there, each carrying attractive features. Here are some best products you can buy:
- Kanguru Defender
Kanguru Defender Elite30

1. SuperSpeed USB 3.0 (Max Read: 230MB/sec; Max Write: 85MB/sec).
2. Physical Write Protect Switch.
3. Central / Remote Management Ready.
4. Windows & Mac Compatible.
5. Real-time Anti-Virus Scanning.
6. Rugged Alloy Housing.
7. TAA Compliant.
8. Available Capacities 8GB, 16GB, 32GB, 64GB, 128GB.
9. Customized Engraving Available.
10. Common Criteria
11. Simple and Easy to Use.
Kanguru Defender Elite200

Advanced Features:
1. FIPS 140-2 Certified, Level 2
2. Remote Management Ready
3. Windows, Mac and Linux Compatible
4. Real-time Anti-Virus Scanning
5. Physical Write Protection Switch
6. Rugged Alloy Housing
7. TAA Compliant
8. Complies with Industry Security Standards such as HIPAA, Sarbanes Oxley, GLBA, etc.
9. Available Capacities: 4GB, 8GB, 16GB, 32GB, 64GB, 128GB.
10. Citrix Ready - XenDesktop Compatible
11. Customized Engraving Available.
12. Custom Colors Available.
13. Simple and Easy to Use.
14. Common Criteria.
Kanguru Defender 2000

Advanced Features:
1. FIPS 140-2 Certified, Level 3.
2. Remote Management Ready.
3. Simple and Easy to Use.
4. Windows, Mac and Linux Compatible.
5. Real-time Antivirus Scanning.
6. Rugged Alloy Housing.
7. TAA Compliant.
8. Complies with Industry Security Standards such as HIPAA, Sarbanes Oxley, GLBA, etc.
9. Available Capacities: 4GB, 8GB, 16GB, 32GB, 64GB, 128GB.
10. Citrix Ready - XenDesktop Compatible.
11. Customized Engraving Available.
12. Common Criteria.
